SignalR with WPF – Part 2

In part 1 we discussed about SignalR, what it is and what it can do, we also wrote an example to establish the connection between the server and the client.. and send signal messages from client to server..

In this article we’ll do the opposite, send signal messages from server to the client..

We’ll just do a little modification in the client component which we developed in the previous article :-

static IHubProxy serverHub;

public void SendSignal(string msg)
{
var hubConnection = new HubConnection("http://localhost:8080/");
serverHub = hubConnection.CreateProxy("CollectionHub");
hubConnection.Start().Wait();
serverHub.Invoke("ClientSignalRecieved", msg);
}

1. We’ll now create an initialization function InitializeSignalR() and move the common code in it and call it in the constructor MainWindow() as we did in the server component, and in the client function we’ll just use the hub proxy to invoke the server function as follows :-

static IHubProxy serverHub;

public void InitializeSignalR()
{
var hubConnection = new HubConnection("http://localhost:8080/");
serverHub = hubConnection.CreateProxy("CollectionHub");
hubConnection.Start().Wait();
}

public void SendSignal(string msg)
{
serverHub.Invoke("ClientSignalRecieved", msg);
}

2. Now let’s write the function RecieveSignal(..) which will be called from the server side and register it on the hub proxy using the function On(..) in the InitializeSignalR() function


public void InitializeSignalR()
{
var hubConnection = new HubConnection("http://localhost:8080/");
serverHub = hubConnection.CreateProxy("CollectionHub");
serverHub.On("RecieveSignal", new Action<string>(RecieveSignal));
hubConnection.Start().Wait();
}

public void RecieveSignal(string msg)
{
Dispatcher.Invoke(new Action(() => txtInfo.Text += "message recieved: " + msg + " \n"), DispatcherPriority.Background);
}

3. Now to call it from the server hub, write the following line:-

Clients[Context.ConnectionId]
.RecieveSignal("send this");

That’s it, hope that was simple and useful 🙂

SignalR with WPF – Part 1

What is SignalR ?

from the official asp.net site, SignalR  is a new library for ASP.NET developers that makes developing real-time web functionality easy. SignalR allows bi-directional communication between server and client.
Servers can now push content to connected clients instantly as it becomes available.

Communication between server and client could happen between .Net code and Javascript, It also could happen between two .Net applications which act as a client-server application.

What are the main components required to establish connection between client and server?

  1. Server component with a Hub which contains the functions that can be called from the client
  2. Client component with a Hub proxy which communicate with the server hub and invoke its methods, and also the Hub proxy can be used to register the client functions which can be called from the server

How to communicate between two WPF applications using SignalR?

  1. download the source code from here, open it in VS, compile it in release mode and get the following dlls:
    • for client application add these dlls as reference:

    SignalR.Client

    • for server application add these dlls as references:

    SignalR
    SignalR.Hosting.Common
    SignalR.Hosting.Self

  2. In the Server application in “MainWindow.xaml.cs”, write an Initialization function to create the SignalR server, and call it in the constructor MainWindow()
    public void InitializeSignalR()
    {
    string url = "http://*:8080/";
    var server = new Server(url);
    server.MapHubs();
    server.Start();
    }
  3. In the Server application, create a Hub class by creating a custom class and inherit from Hub
    // The exact name of the hub class you create will be used
    // to create the hub proxy in the client
    public class CollectionHub : Hub
    {
    public CollectionHub()
    {
    }
    // server function to change a TextBlock element in WPF
    public void ClientSignalRecieved(string msg)
    {
    // To access WPF elements from class other than the MainWindow
    // you can use the following code
    Application.Current.Dispatcher.Invoke(new Action(() =&amp;amp;amp;amp;amp;gt;
    ((MainWindow)System.Windows.Application.Current.MainWindow).txtInfo.Text = msg), DispatcherPriority.Background);
    }
    }
  4. In the Client application, define a global static hub proxy
    static IHubProxy serverHub;

    then write the client functions to call the server functions created in the hub using the hub proxy

    public void SendSignal(string msg)
    {
    // create a hub connection using the ip and port number
    // of the server component which carry the hub class
    var hubConnection = new HubConnection("http://localhost:8080/");
    // create hub proxy using the hub name you created
    // to communicate with the server  hub and invoke its methods
    serverHub = hubConnection.CreateProxy("CollectionHub");
    // start the connection
    hubConnection.Start().Wait();
    // use the hub proxy to invoke the server method and pass
    // the parameters needed by the function
    serverHub.Invoke("ClientSignalRecieved", msg);
    }
    

Senior Software Engineer Interview Questions(.Net)

This list will be updated continuously, you can add comments with good questions and answers and this will be appreciated

  1. What do you know about design patterns? what are its types? and why they are important?
  2. What is anti-pattern?
  3. What is continuous integration?
  4. What are the benefits of using MVC?
  5. Does MVC use session variables?
  6. If you have an e-commerce website how would you save products in the cart with the user being anonymous?
  7. Can you use a WCF service directly into a webpage using AJAX? How?
  8. How does the viewbag in MVC work internally?
  9. How can you detect the lack of performance in your application? and what procedures you can take to fix it?
  10. How can you detect the lack of performance in the database? and what procedures you can take to fix it?
  11. How can you use logging in your application? and if you log using the database, how can you reduce the database hits of the logging?
  12. How can you implement paging?
  13. What is the data type returned from WCF function? and can we change this data type? how?
  14. What are the types of database indexing? and are its purpose?
  15. How can we make changes in the database using the concepts of a whole transaction/ rollback in the c# code?

Element position is fixed starting from a certain point

If you want an element on your html page to be fixed while you are scrolling, but you don’t want it to appear right away, you want it to appear or to be positioned with another element there down the page.

Example: you have a page of html which divided into screens, first screen is the intro, then the coming screens which come as you scroll are the html content, and you want a fixed menu to stay visible as you scroll up and down, but you want it appear after the first intro screen not from the very beginning of the html.

Let’s say we have 3 screens in the html, add the floating menu to the screen where you want to start the floating menu at it:


<div class="screen1"></div>
<div class="screen2">
 <div class="persist-menu">Menu</div>
</div>
<div class="screen3"></div>

Give them some css

.screen1{
background-color: red;
width: 100%;
height: 1080px;
}
.screen2{
background-color: blue;
width: 100%;
height: 1080px;
}
.screen3{
background-color: green;
width: 100%;
height: 1080px;
}
.persist-menu
{
position: absolute;
font-size: 40px;
}

Here are the jQuery:

function UpdateMenuPosition() { //create function to update menu position
var startingScreen = $(".screen2"), //catch the screen of the starting position of the menu and get it's position
offset = startingScreen.offset(),
visibleArea = $(window).scrollTop(), //get the top position of the visible area of the html with respect to the top of html
floatingHeader = $(".persist-menu", startingScreen )

if (visibleArea > offset.top) { //as long as the top position of the visible area is greater than the top position of the screen component
floatingHeader.css({top:(visibleArea )}); //move the menu to the top of the visible area
}
}

$(function() {
$(window).scroll(UpdateMenuPosition); //bind the window scrolling to the above function
});

Uneven distribution of ELB

The Issue

1 

Our Application (Diagnosoft Virtue) needed to have a scalable servers farm so that when the load increases on the existing servers, an auto scaling mechanism should expand the servers farm by adding another servers to it, and a load balancing technique should balance the load between the launched servers, so that the new client can be served smoothly with high performance and without affecting any of the existing clients.

To achieve this we assumed that each server (Amazon m3.large) can serve up to 3 clients if they used our application to the maximum resource consumption, so we measured the server load by the number of virtue clients not by the common readymade measures like memory or CPU efficiency, which is not exists in the exciting metrics, so we developed a custom metrics called Userslimit using .Net and AWS SDK to calculate the number of clients per server and send an alarm every 5 mins to the auto scaling, the developed application which sends this measure should be running on the back-end server to read from the database the connected number of clients.

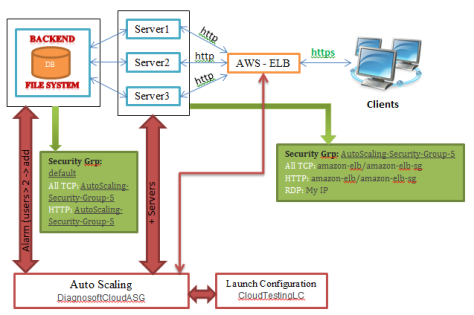
The issue is that ELB (elastic load balancer) of AWS is not balancing the load evenly among the available servers although it’s mentioned that it uses round robin algorithm in balancing, its detailed mechanism is not clearly determined in AWS help docs but the articles on the internet assumed that ELB uses range of IPs automatically assigned for each available server behind the ELB, so when a request comes from a client it checks its IP falls in which range of IPs and assigned it to the relevant server. So we can find many clients fall within the same range of IPs assigned to a server while other servers are not utilized, which might lead to bad performance for connected clients, the figure above describes the old mechanism for load balancing and auto scaling.

The Proposed Solution

2

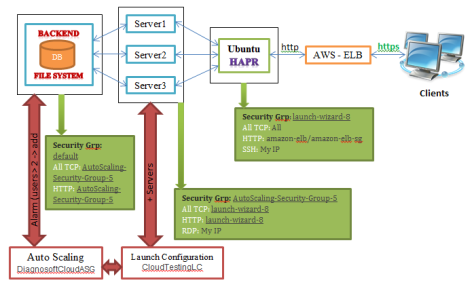
After researching and reading multiple articles we came up to use HAProxy instead of ELB, HAProxy is a free open source load balancer, available to be installed on UNIX machine, the figure above describes the new architecture of the load balancing and auto scaling mechanism.

HAProxy provides low level configuration and adjustments so that it can be configured according to our needs and to whatever balancing algorithm that best fit our needs, we chose least connection algorithm for balancing as it is best for longer client sessions in which the new client requests are directed to the server with least connections to it.

How we achieved that

  1. Launch new EC2 instance with Ubuntu operating system and named it Ubuntu HAProxy
  2. Connect to the Ubuntu instance from windows using PuTTY (PuTTY is a free (MIT-licensed) Win32 Telnet and SSH client)

PuTTY Download page: http://www.chiark.greenend.org.uk/~sgtatham/putty/download.html

Instructions: https://docs.aws.amazon.com/AWSEC2/latest/UserGuide/putty.html?console_help=true

  1. Install HAProxy and configure it simply by modifying a configuration file called haproxy.cfg ,

Refer to the below link to Install HAProxy on Ubuntu and to know some basic configurations:

https://serversforhackers.com/load-balancing-with-haproxy

  1. After installing HAProxy you can run the command sudo nano /etc/haproxy/haproxy.cfg in PuTTY to modify the file.

Sudo: super user do (gives you privilege of modifying the file)

Nano: is a text editor

/etc/haproxy/haproxy.cfg: the path of the HAProxy configuration file

  1. In order to achieve auto scaling, install a component on Ubuntu from GitHub called haproxy-autoscale which updates the configuration file haproxy.cfg every minute with the current available servers, the component uses a template for haproxy.cfg that can be modified as needed to match the configuration we want, to install it do the following:

(below is the configuration template we used including stickiness and checks)

haproxy-template.cfg

  1. To make the auto scale run every minute, create a job on the Ubuntu machine that runs a specific file in haproxy-autoscale which is responsible to update the configuration file haproxy.cfg with the specific given parameters,

To create new job:

  • Run this command in PuTTY to open a text file where you register a job: export VISUAL=nano; crontab -e
  • Write the below command at the end of the file:

* * * * * /usr/bin/python /home/ubuntu/update-haproxy.py –access-key=’your-access-key’ –secret-key=’your-secret-ke’ –security-group=’security-group-of-the-servers’ –output=’/etc/haproxy/haproxy.cfg’

  1. Removed the load balancers from the auto scaling in AWS to prevent attaching the scaled instances to ELB.
  2. After doing all this and running the Ubuntu machine steadily, attach it to ELB manually from the edit instances button, and if it’s there but out of service we run the command sudo service haproxy reload in PuTTY to reload the HAProxy and remove it from ELB then re-add it again.
  3. Log in to http://{IP of the Ubuntu machine}:10005/haproxy?stats to monitor the HAProxy load balancer and the servers activity.

Hope this article helps anyone has similar issues, don’t hesitate to ask me anything related 🙂

SSL Certificates for ELB

Install Certificate in ELB

  • Download and install OpenSSL for windows

https://www.openssl.org/community/binaries.html

  • Using OpenSSL, type commands to generate private key and CSR

1: Generate private key

openssl genrsa -des3 -out my_domain.pem 1024 [Enter and confirm pass phrase]

2: Generate CSR

openssl req -nodes -newkey rsa:2048 -keyout my_domain.pem -out my_domain.pem

3: Remove pass phrase from key

*copy my_domain.pem to new file and call it my_domain.pem.org

openssl rsa -in my_domain.pem.org -out my_domain.pem

Refer to the below link for explanation about creating private key and CSR:

http://docs.aws.amazon.com/opsworks/latest/userguide/workingsecurity-ssl.html#d0e30448

  • Activate the certificate using the private key and the CSR generated from OpenSSL , follow the activation instructions

Attach your domain with your ELB using Amazon Route 53

  • Create Record Set for http://www.your-domain.com
  • Enter “www” in the Name textbox
  • Choose A-IPv4 address from the Type dropdown
  • Choose yes from the Alias radiobuttons
  • Choose the domain of the load balancer from the Alias Target options textbox
  • Choose failover from the Routing Policy dropdown
  • Choose Primary from Failover Record Type radiobuttons
  • Choose yes from the Evaluate Target Health radiobuttons
  • Choose No from the Associate with Health Check radiobuttons
  • Click on Create
  • Create Record Set for your-domain.com
  • Leave the Name field blank
  • Choose A-IPv4 address from the Type dropdown
  • Choose yes from the Alias radiobuttons
  • Choose the domain of the load balancer from the Alias Target options textbox
  • Choose failover from the Routing Policy dropdown
  • Choose Secondary from Failover Record Type radiobuttons
  • Choose yes from the Evaluate Target Health radiobuttons
  • Choose No from the Associate with Health Check radiobuttons
  • Click on Create
  • From the record set of type NS copy the values of the name servers
  • In the Domain website go to manage the domain you want to associate with the ELB
  • Paste the copied values of the name servers into the Nameservers field of the domain
  • It might take some time to register the domain with the name servers (around 30 min. – 1 hour)